
Here is my first attempt at creating a tutorial in the form of a blog post. I will outline all the steps I used to create this floating shelf and if you want to watch how I did it, the video is embedded below. I hope you enjoy. Feel free to leave a comment on here or on the YouTube video, I would love to hear what you think.

I recently moved into a new studio and have been constantly changing around the space. I think I have got it to a place where I like it. I have an office area set up and an MCM couch with a cookie coffee table I made to help me relax and give me a space to think and design.

In order to get more organized, I realized I need a shelf. So, I took a look around and found some wood, about 7 feet long, 9 inches wide that I got from the side of the road a few months ago. It was a broken pine bed frame; I got some good pieces of wood from it and this was the last one. I also had some scrap metal, 1 in flat stock about 6 feet long and some 3/8 round stock.
Anytime I need to make something for myself, I use that opportunity to try some new techniques. I decided on a floating shelf. The metal would be mounted to the wall and I would drill holes in the shelf that would be able slide on to the bracket.
Materials Used
Pine Board (Milled to 6 ft by 8 in x 1 ¼ in high)
1 inch by ¼ flat stock steel, 6 feet long
3/8 by 3 feet round stock steel
Tools Used: (you can click on some of these tools if you are interested in buying on amazon)
Marker
Jointer
Planer
Table Saw
Compound Miter Saw
Battery Drill
1/8in drill bit
3/8 in drill bit
½ in drill bit
MiG Welder
Angle Grinder with 40 grit sand disc
Minwax Spray Lacquer
¼ spiral router bit
¾ router bit
12 inch F style clamps
Level
Step 1: Find and mark studs
After deciding where to put the shelf, I had to mark where the studs are. I’m using a stud finder to find the metal stud.


Step 2: Mark your level line where you want the shelf
Now that I’ve found the studs, I draw a level line where the shelf will go so that I can later drill the holes for the anchors

Step 3: drill pilot hole
Using a 1/8 in drill bit, drill the pilot holes. Im doing this to ensure that I am on the metal stud and it will help when I drill with a larger drill bit.

Step 4: Drill holes for anchors
Using a ½ inch drill bit, drill the holes for the anchors. I used Toggler heavy duty ¼ toggle bolts that use a ½ hole.

Step 5: Install anchors
Insert the toggle bolts into the hole you drilled and then slide the one end to the wall to tighten against the drywall. Snap off the remainder of the plastic.
Step 6: Gather Materials
This is when I got all the materials together. I guess if you were to do this project, you would want to get all the materials together before you start. I had all the materials and had a plan for what I was going to do but this is the order I did it in the video.
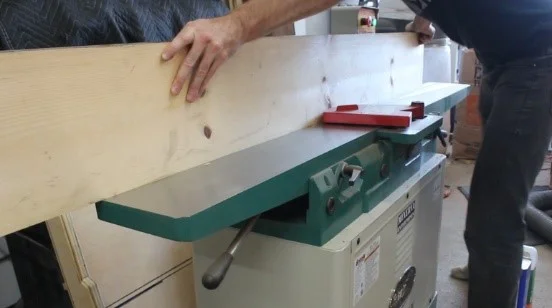
Step 7: Joint one edge
Because I was using reclaimed wood, I needed to mill it to the correct size. If you are using wood purchased at a home store you can mill it in order to get it to the size you need.

Step 8: Cut to width
The shelf will be 8 inches deep so I need to cut off about 1 inch.

Step 9: Face Joint one face
This step is used in the process of squaring up the wood using the straight edge we already created. Do as many passes as it takes to get the face flat.

Step 10: Plane to thickness
The board was about 1 ½ inches thick, I needed to plane it to get it to 1 ¼ so that it was square and that I had 1/8 on the top and bottom to hide the bracket once installed

Step 11: Cut to length:
Using a Miter saw, I squared up both ends and cut the board to exactly 6 feet.
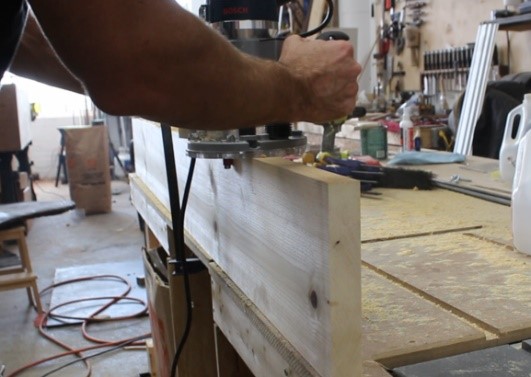
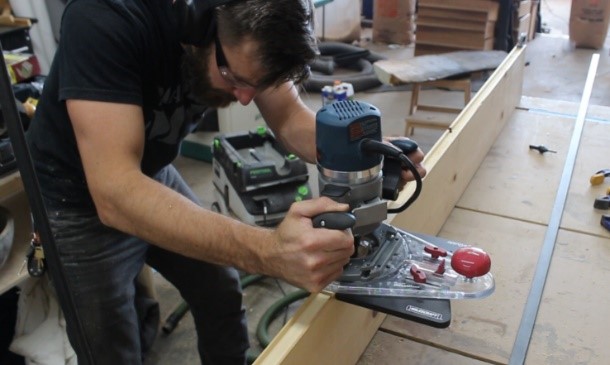
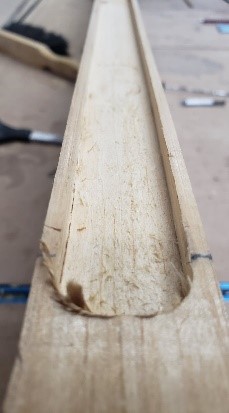
Step 12: Route a 1 inch groove in back of shelf where the metal bracket will be hidden
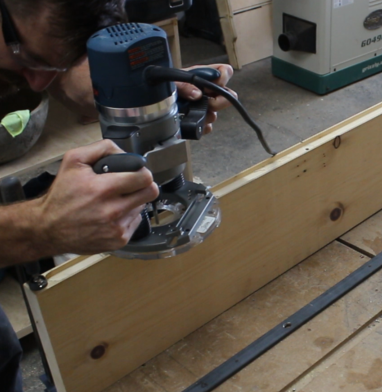
In order for the shelf to look like its floating, ideally you don’t want to see how the shelf is mounted to the wall. With this in mind, I decided to route a groove in the shelf so that the bracket would be hidden from the top and bottom. Based on the size of the square stock I had, I had to do this using several techniques. First I removed the center material using a mortising guide attachment for my router, this removed the center ¾ inch, then to fit the rest, I had to remove 1/8 from each side, so I used the same ¾ in bi and an edge guide. Take a look a the picture for an up close of the 1/8 lip that was left to hide the bracket.
Step 13: Cut metal to length
I used a metal cutting band saw to cut the metal but you can use a hack saw or reciprocating saw if you don’t have one.


Step 14: Measure and mark for anchor holes
Measure out where the holes for the anchors will be drilled. My studs were 16 inches on center, with the steel in the groove, I measured 16 inches from the end of the shelf and marked it, then 16 more until i marked all the holes.

Step 15: Drill anchor holes
You will need to drill holes int he metal bracket so you can mount it to the wall. I used a metal drilling stepped drill bit. It makes it easier to drill through metal.

Step 16: Mark back of shelf to countersink where anchor heads
After your holes are drilled, place the steel back in the groove and make where the holes are. this way, you can mark where the bolts for the anchors will be so you can countersink them later.

Step 17: Mark where round supports will be welded
While the steel is still in the groove, space out where you want to put the steel rods. I spaced them out evenly making sure they didn’t overlap where the holes for the anchors were.

Step 18: Transfer marks to shelf
Using a square, transfer your marks to from the steel to the shelf so you can line them up later and know where you will need to drill the holes in the next step
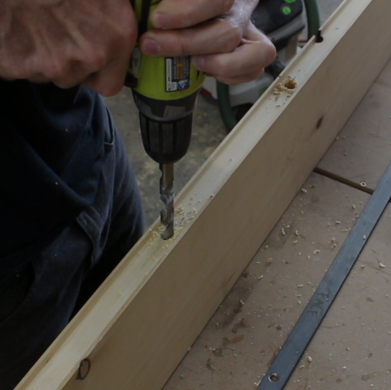
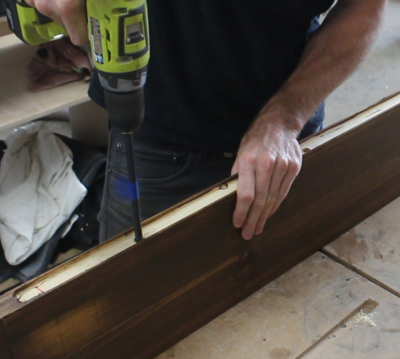
Step 19: drill holes for metal rods
Next you will need to drill holes that the metal rods will slide into. the hole needs to be about 7 inches deep. Don’t go more than this so that you don’t drill through what will be the face of the shelf. I do not have a drill press so I did this first with the plunge router and a spiral bit to keep the hole plumb. After I plunged about 2 inches deep, I switched to a battery drill with a 3/8 drill bit. I used the one I had which was too short so I had to go back later and do it with a longer one. If you have the longer drill skip using the shorter bit.
**make sure you get all the saw dust out of the hole so that you dont run into problems later.**

Step 20: Drill countersink holes for anchors
Using a 1/2 inch drill bit, countersink about 1/4 inch on the marks we marked in step 16.

Step 21: Measure and cut round stock
Measure out and mark every 7 inches to get 5 pieces of round stock.
Step 22: Weld round stock to shelf bracket
Using a Mig welder, weld the 5 rods onto marks you made on the flat stock you are using as the mounting bracket.

**If you do not have a welder or do not know how to weld, you can use different methods to get the same effect. For example; you can use 7 inch bolts or 3/8 threaded rod and drill holes and use nuts to secure them to the mounting bracket. If you do this, you will have to drill more countersinks in both the wall and the shelf so that the shelf slides on to the bracket.**
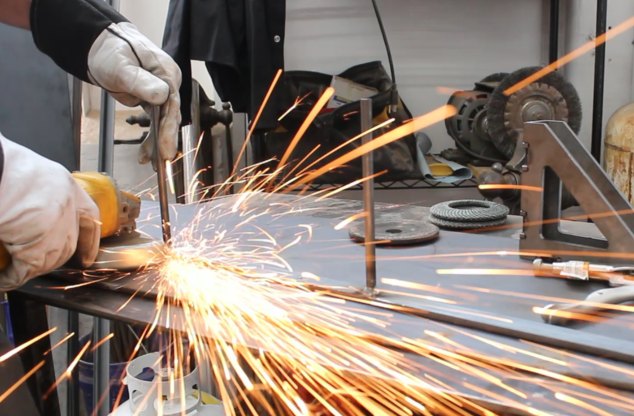
Step 23: clean up welds
Using an angle grinder and a 40 grit sanding disc, I cleaned up the welds.
Step 24: Apply Stain to shelf
I decided to stain the shelf an antique walnut. I used a gel stain by general finishes. Wipe on the stain and then after a few minutes, wipe off the excess.


Step 25: Add clear coat
After about 15 minutes you can apply a clear coat. I did three coats of Minwax spray lacquer.

Step 26: Mount the shelf bracket
Using the bolts for the anchors, bolt on the bracket to the wall. I used a battery drill with a phillips bit.
Step 27: Slide shelf onto bracket
Once the bracket is installed you are ready for the shelf to get installed. Line up the rods with the pre-drilled holes and slide the shelf back to the wall. If this doesn’t go on easy, you can use the heel of your hand or rubber mallet and a piece of wood to hit it on. If you have a real difficult time, there might be an issue like saw dust in the hole, double check everything.

Step 28: Put all your stuff on it
I used this shelf to put some woodworking books and some other things I made like my MADE BY M.E. sign and some bowls. Enjoy your shelf.
